

Data Import Wizard
Data Import Wizard allows you to import data for standard Salesforce objects such as accounts, contacts, leads, solutions, campaign members, and person accounts. You can also import data for custom objects as well. With the Data Import Wizard, you can import up to 50,000 records at a time. You can import data from ACT!, Outlook, and any program that can save data in comma-delimited text format (.csv), such as Excel or GoldMine.
Important:
Salesforce has replaced the individual import wizards for accounts, contacts, and other objects with the Data Import Wizard. Individual import wizards open in small popup windows, while the Data Import Wizard opens in a full browser with dataimporter.app at the end of the URL. From Setup, enter Data Import Wizard in the Quick Find box, then select Data Import Wizard. The options you see depend on your permissions.
Note:
- Salesforce recommends testing a sample data file first to make sure that your data source is prepared the right way.
- Do not run more than one import job at a time, even if the jobs are from separate browser windows.
- The following browsers are supported:
- Chrome version 29 and later
- Mozilla Firefox version 23 and later
- Internet Explorer version 9 and later
- Apple Safari version 5 and later
- The following records cannot be imported:
- Assets
- Cases
- Campaigns
- Contracts
- Documents
- Opportunities
- Products
- Importing custom objects into communities is not supported.
The number of records that you are able to import depends on your permissions and the type of data that you are preparing to import. As long as you don’t exceed the overall data storage limits for your org, you can import as many records that you are allowed to.
Which Records Can Be Imported?
| Type of Record | Import Record Limit | Users Permissions Needed | Learn More |
|---|---|---|---|
| Business accounts and contacts owned by you | 50,000 at a time via the Data Import Wizard | Import Personal Contacts | What Is Imported for Business Accounts and Contacts? |
| Business accounts and contacts owned by other users | 50,000 at a time | Modify All Data | What Is Imported for Business Accounts and Contacts? |
| Person accounts owned by you | 50,000 at a time | Create on accounts AND Edit on accounts AND Import Personal Contacts | What Is Imported for Person Accounts? |
| Person accounts owned by other users | 50,000 at a time | Create on accounts AND Edit on accounts and contacts AND Modify All Data | What Is Imported for Person Accounts? |
| Leads | 50,000 at a time | Import Leads | What Is Imported for Leads? |
| Campaign members | 50,000 at a time | Depends on what’s being imported: • Campaign member statuses • Existing contacts • Existing leads • Existing person accounts • New contacts • New leads | What’s Imported for Campaign Members? |
| Custom objects | 50,000 at a time | Import Custom Objects AND Create on the custom object AND Edit on the custom object | What Is Imported for Custom Objects? |
| Solutions | 50,000 at a time | Import Solutions | What Is Imported for Solutions? |
| Assets Cases Campaigns Contracts Documents Opportunities Products | You can’t import these records via the Data Import Wizard. | You can’t import these records via the Data Import Wizard. |
Using the Data Import Wizard
Knowing how to deal with data in the most efficient way possible will make you indispensable as a Salesforce Administrator. Your team will be counting on you to add and update records as they collect valuable information on new accounts, leads, opportunities, etc.
Manually entering record information one by one is a very tedious process. Who has time for that? Time is money so the more output you produce in the less time as possible makes you more valuable and more productive.
Preparing a File for Import
In the following tutorial, you will be loading a list of leads that your sales team has compiled. You will download this file, save it to your desktop or external drive as a CSV (comma delimited) file, and then import the file to your org.
Note:
To ensure that you have clean and accurate data in Salesforce, you should check your data before importing it. Make sure that it meets system and custom data validation requirements. Remove any duplicate records, blanks, and empty spaces. Rename columns to match the field names in Salesforce as needed. Apply consistent standards for data formats (for example, USA vs. US vs. United States). Running a spell check is also very helpful.
Step 1: Click here to download the Lead-Import Excel file. This file needs a little data clean up before importing it into Salesforce.
Tip: You can freeze the top row in the Excel file so you can always view the column heading while scrolling through data. To do this, select View → Freeze Panes → Freeze Top Row.
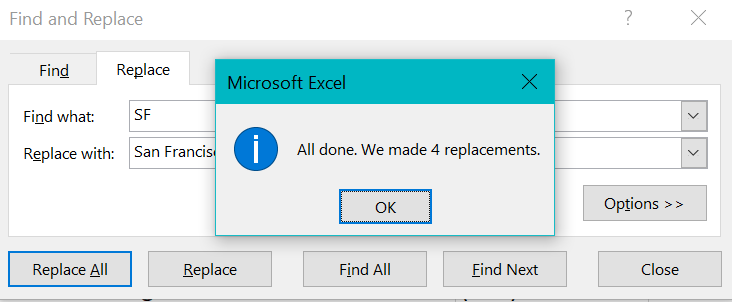
Step 2: Replace any instances of SF with San Francisco. Within the Leads Excel file, press Ctrl + F to bring up the Find and Replace feature. Select “Replace” and type SF in the “Find What” box. Next, Type San Francisco in the “Replace With” box. Click the “Replace All” button. This step replaces all SF instances with San Francisco. There should be four replacements.
Step 3: Press Ctrl + F and replace any instances of Caf or Cali with CA. Type each instance separately. Caf should have three replacements and Cali should have five replacements.
Step 4: Press Ctrl + F again and replace any inconsistent Rating values with equivalent picklist values already present in Salesforce (Cold, Warm, Hot).
- Replace Ice Cubed with Cold
- Replace Freezing with Cold
- Replace On Fire! with Hot
Ice Cubed should have two replacements, Freezing should have three replacements, and On Fire! should have three replacements.
Step 5: Save the lead_import file as a CSV (comma delimited) file named “Lead Import” to your desktop or external drive.
Getting Started with the Data Import Wizard
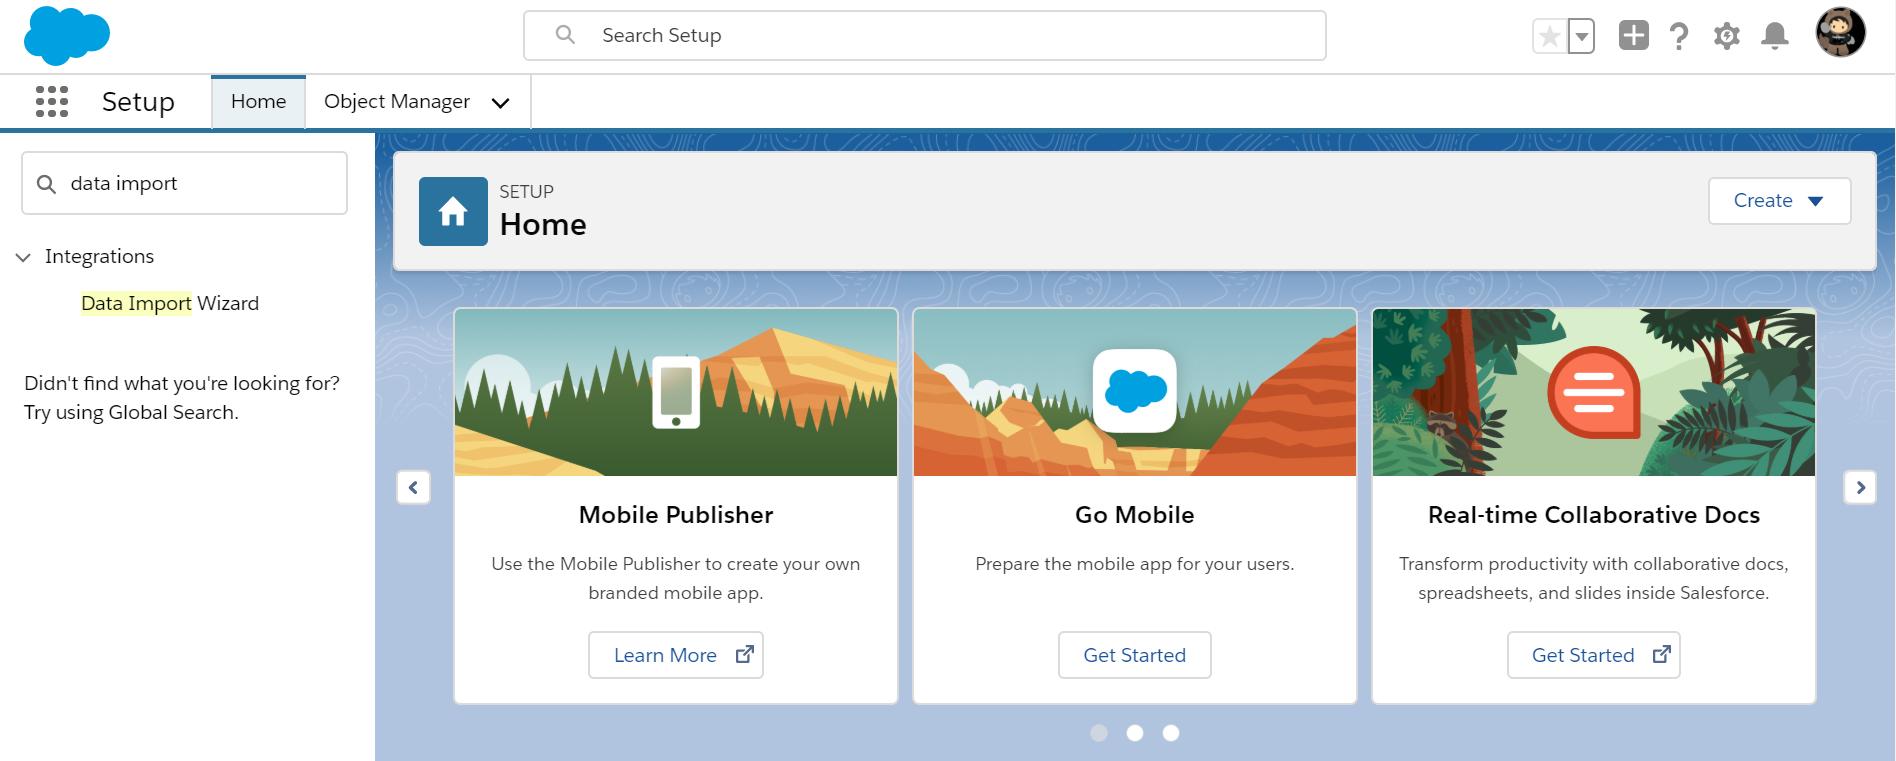
Step 1: From the setup menu, enter Data Import Wizard and then select it.
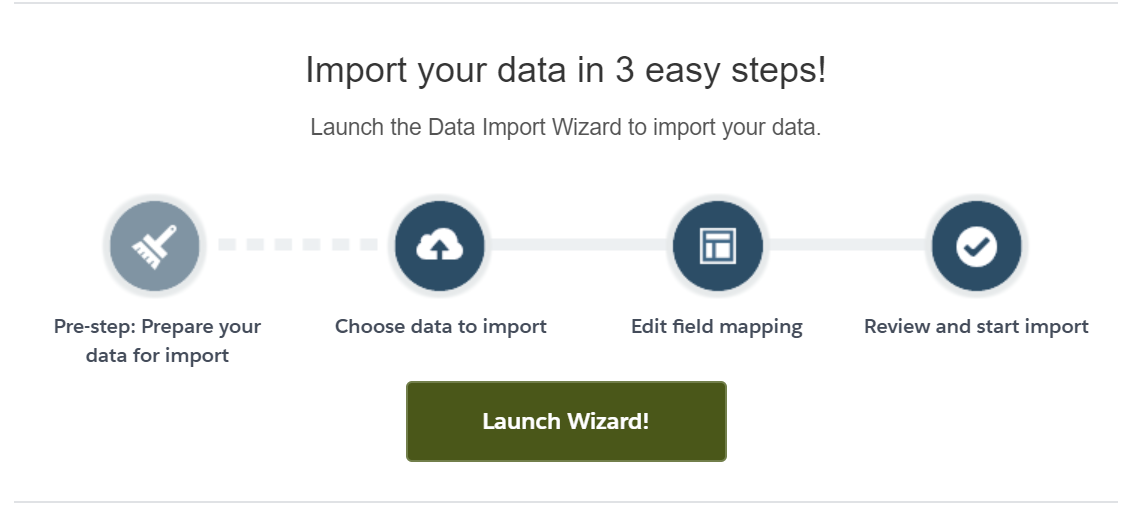
Step 2: Click Launch Wizard, then choose the data to import.
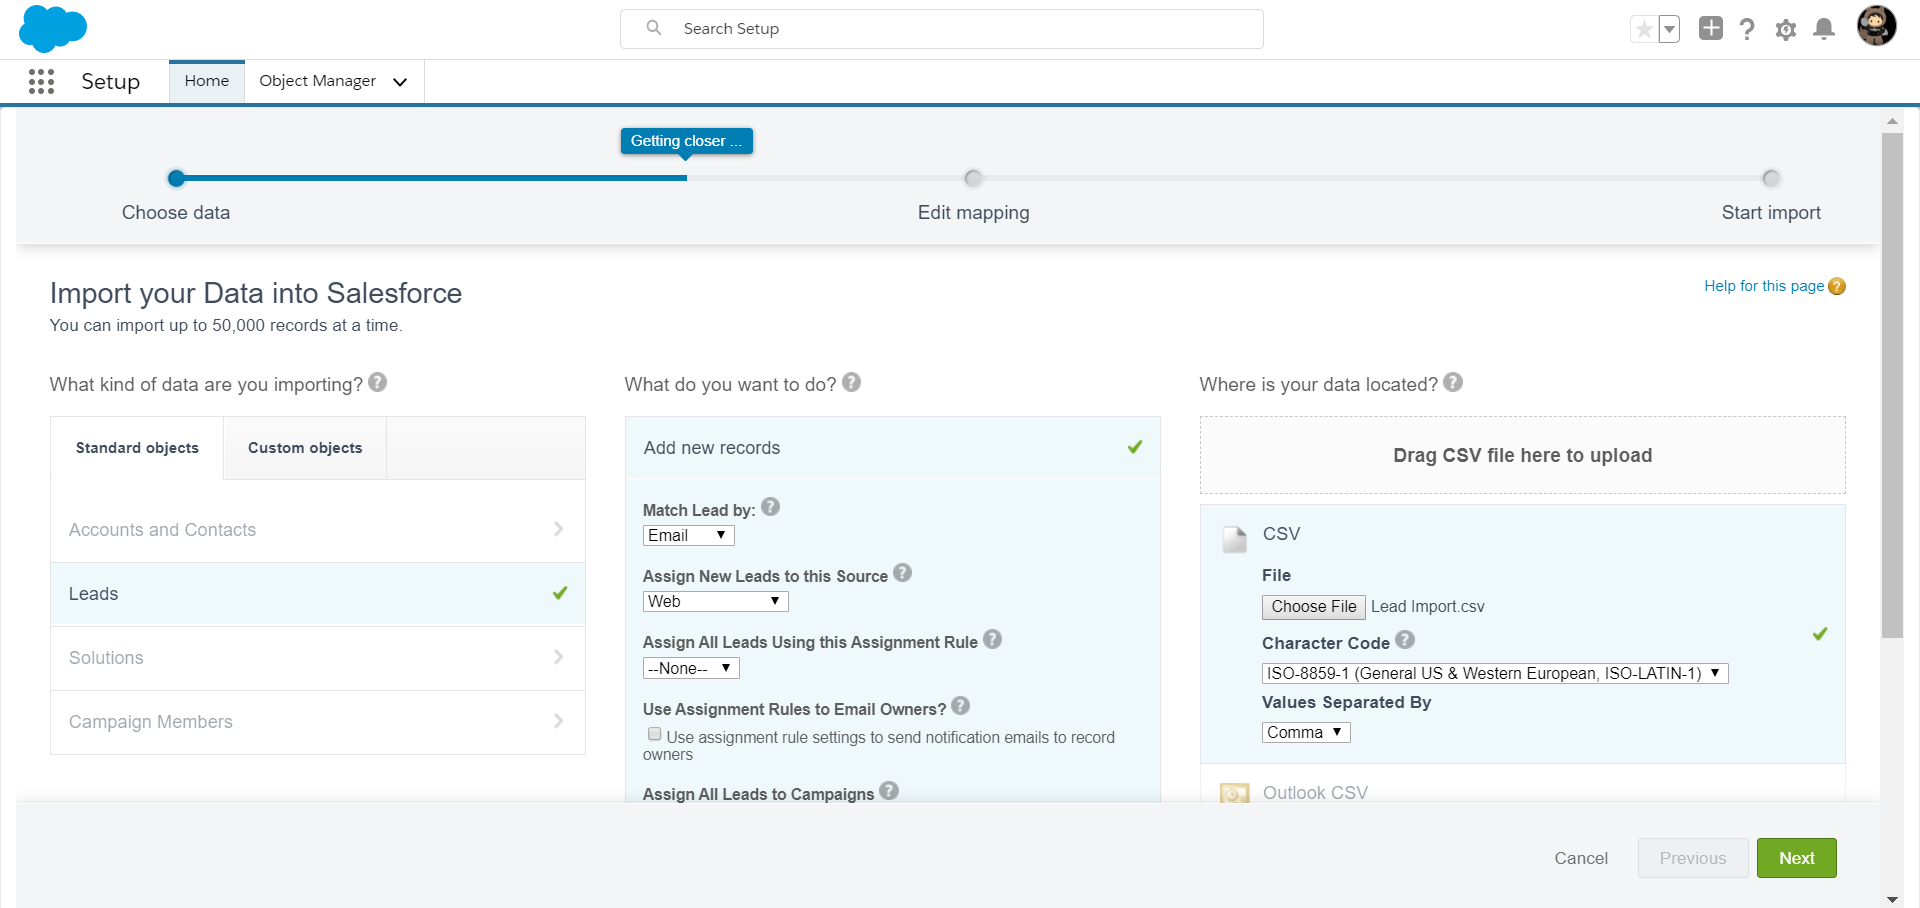
Step 3: In the Standard Objects tab, click Leads.
Step 4: Under What do you want to do? Click Add New Records and select the following options:
- Match Lead by: Email
- Assign New Leads to this source: Web
Step 5: Under Where is your data located? click CSV. Choose the updated Lead Import file and click Next.
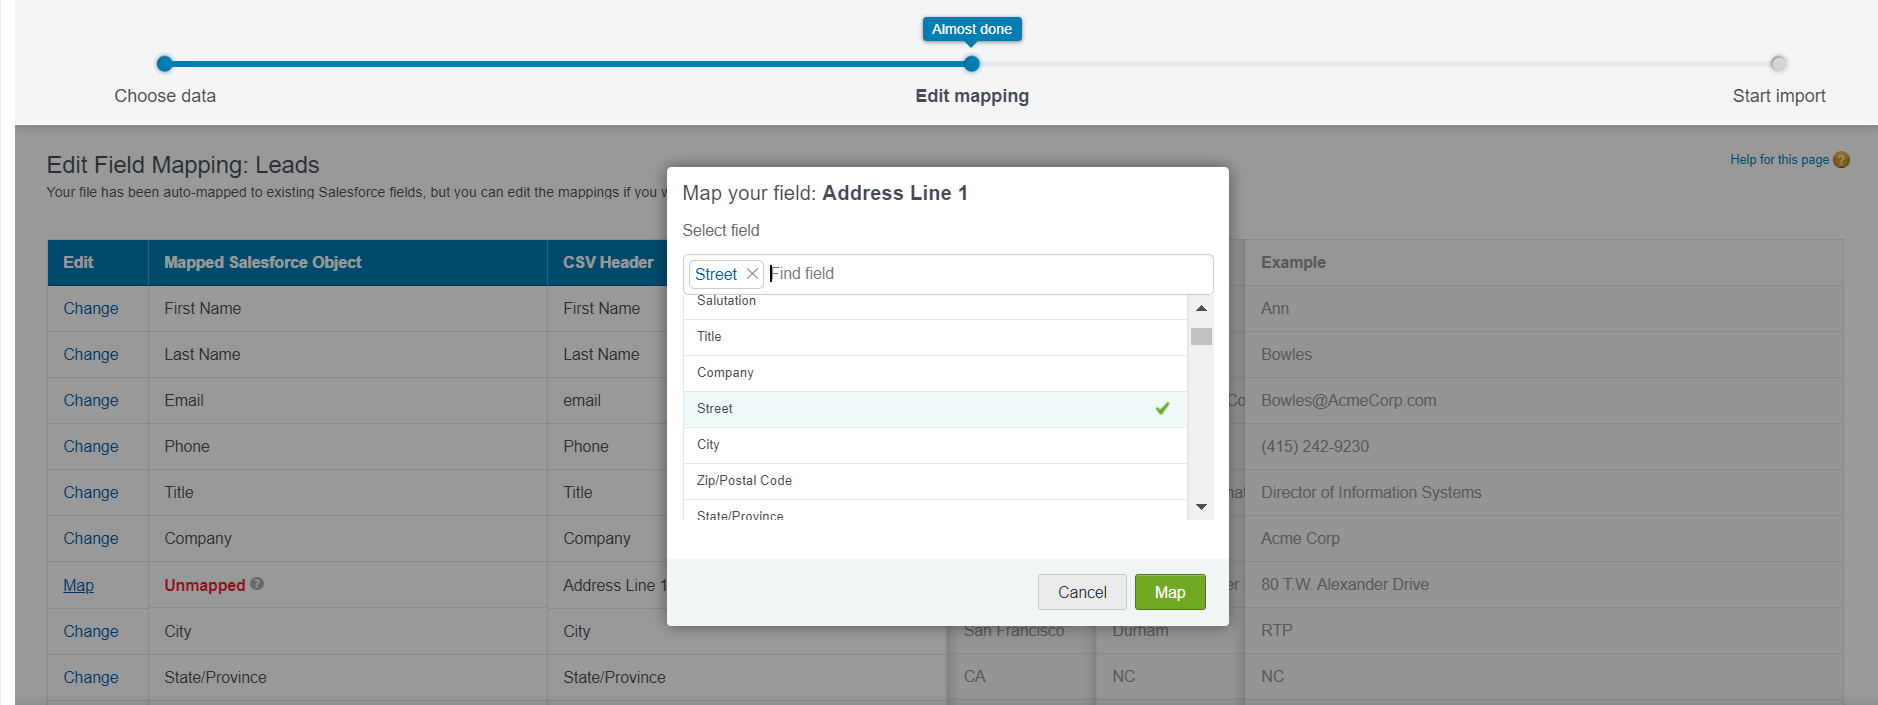
Now you can edit the field mapping. First map the Address Line 1 column to the Street field.
Step 1: In the Edit column, click Map next to Address Line 1.

Step 2: Select Street, from the Map your field: Address Line 1 list. Click Map. (Note: If you do not see the Next button, click zoom on your browser toolbar and decrease the percentage.)
Step 3: In the Edit column, click Map next to Owner.
![]()
Step 4: Select Lead Owner, from the Map your field: Owner list. Click Map.
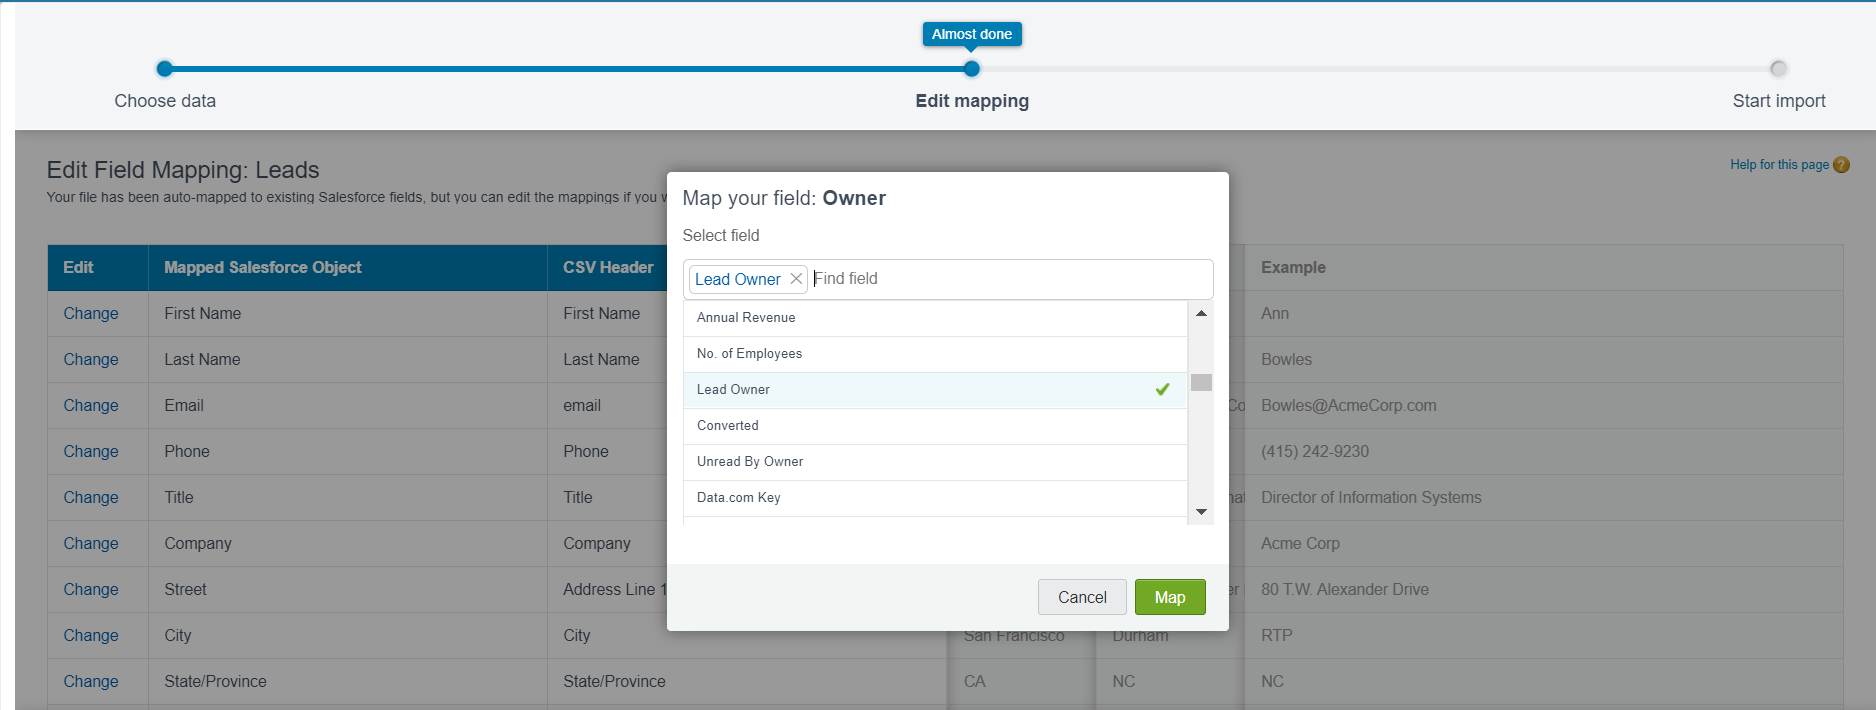
Once the Address Line 1 and Owner fields are mapped, start importing!
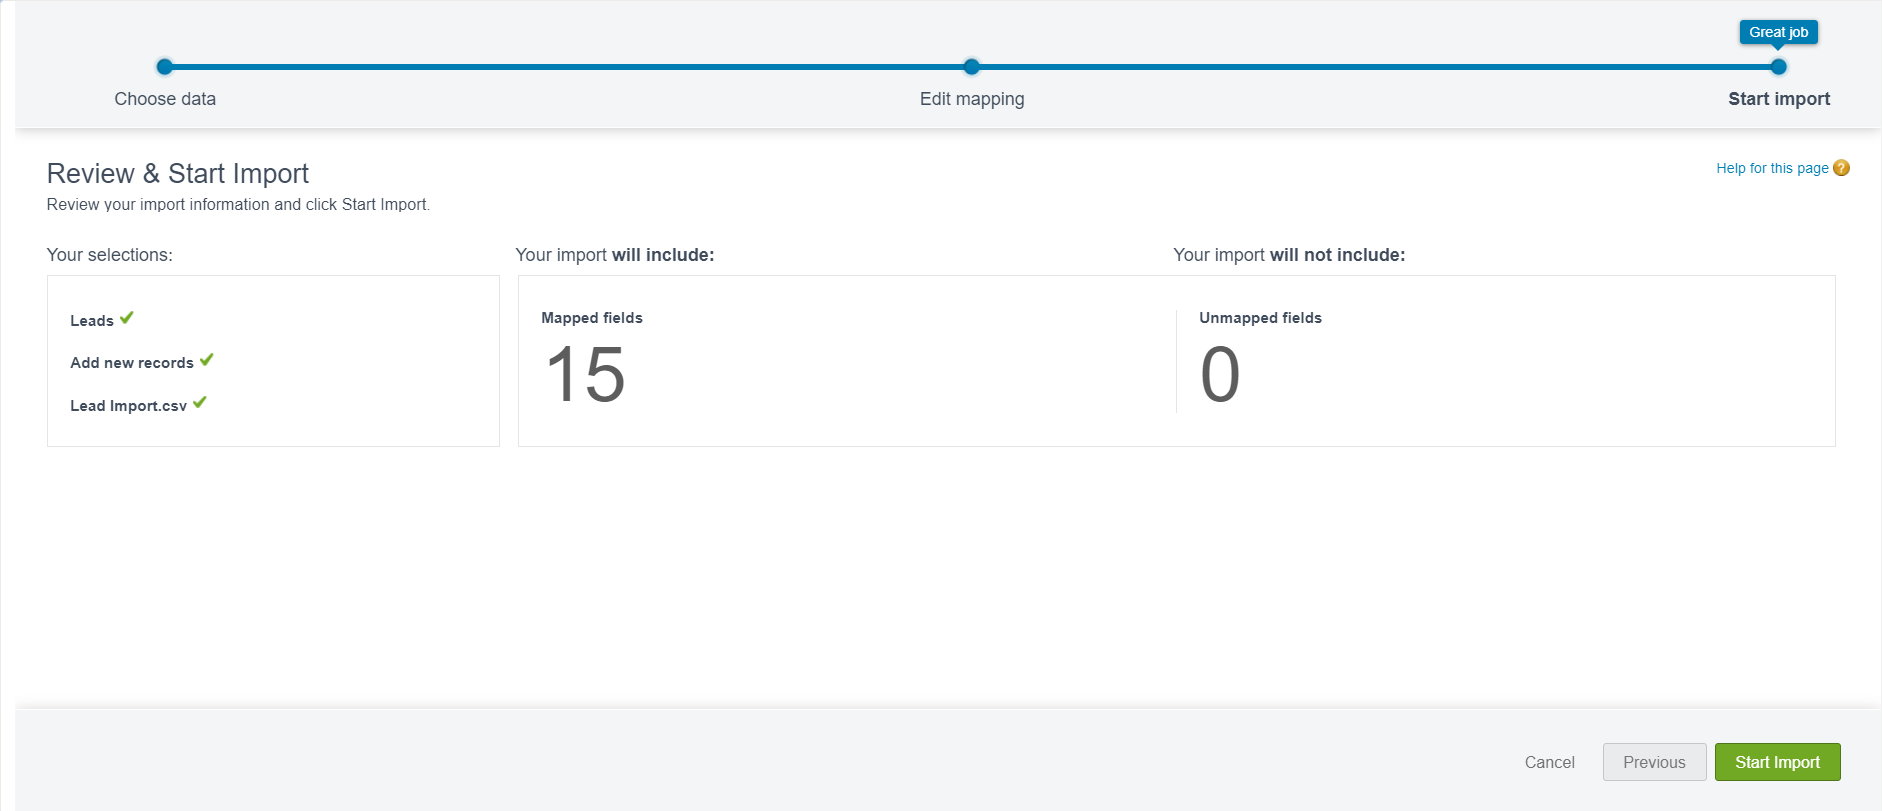
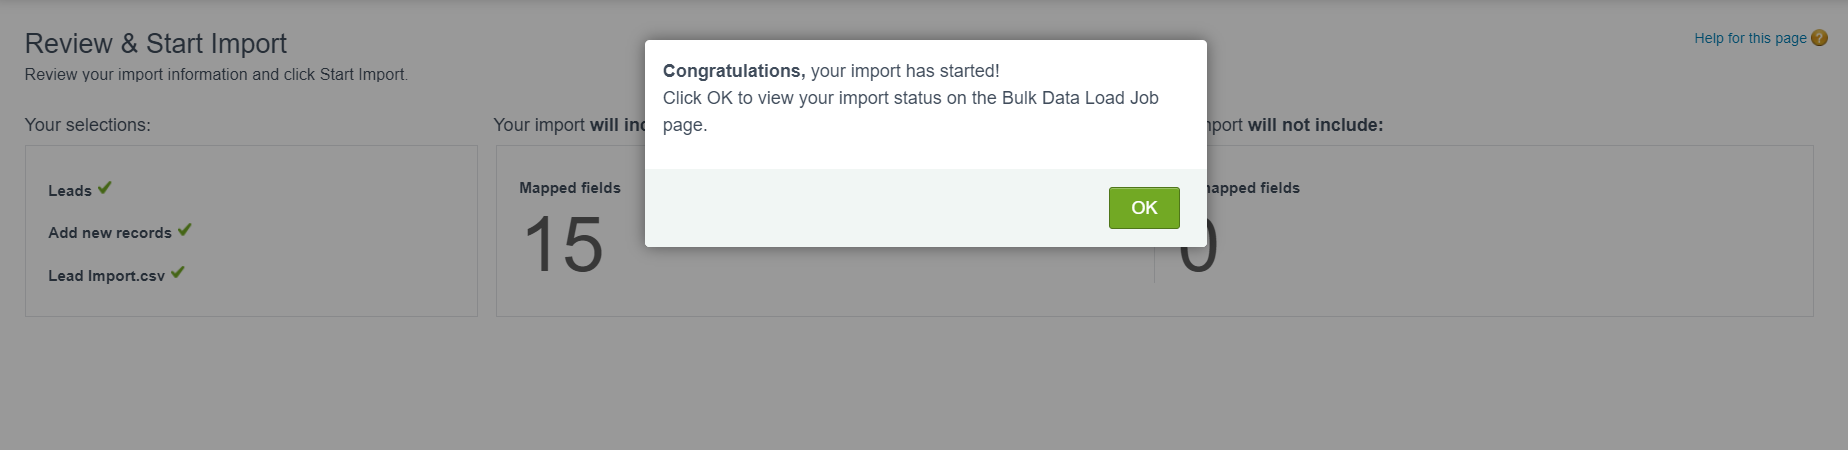
Step 5: Click Next, Click Start Import, Click OK.
Congratulations! Your import has started.
The details of the bulk data load job should convey the following:
Progress = 100%
Status = Complete
Records Processed = 44
Records Failed = 0
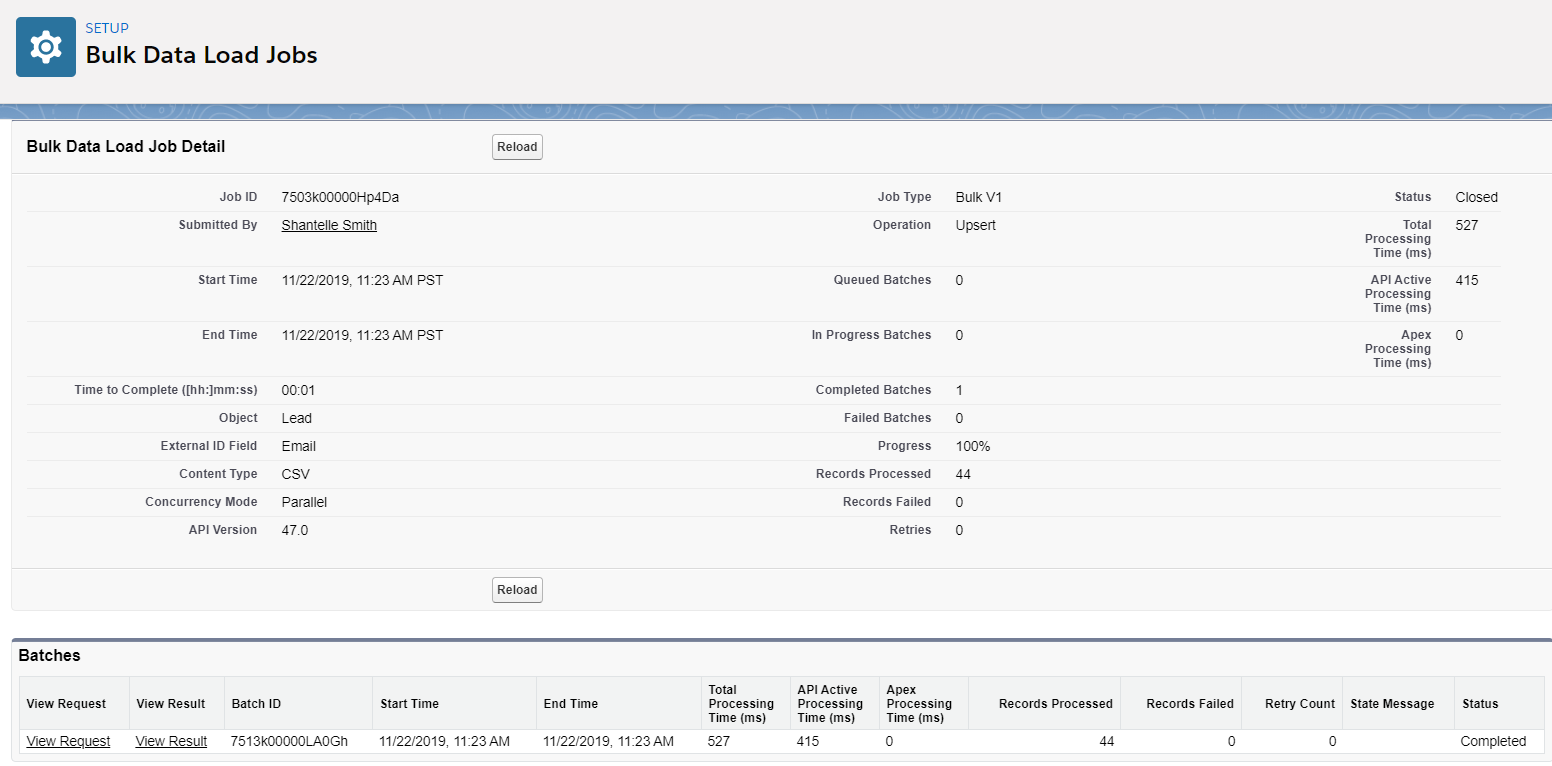
You will also see the details of the Bulk Data Load Job via email to indicate that your import is complete.
Data Import Issues
If you are experiencing issues with successfully processing records…keep the following in mind:
- Make sure to review your CSV file and look at the fields you have available and required for the object that you are importing. Usually records fail due to mapping issues including CSV fields missing data prior to import.
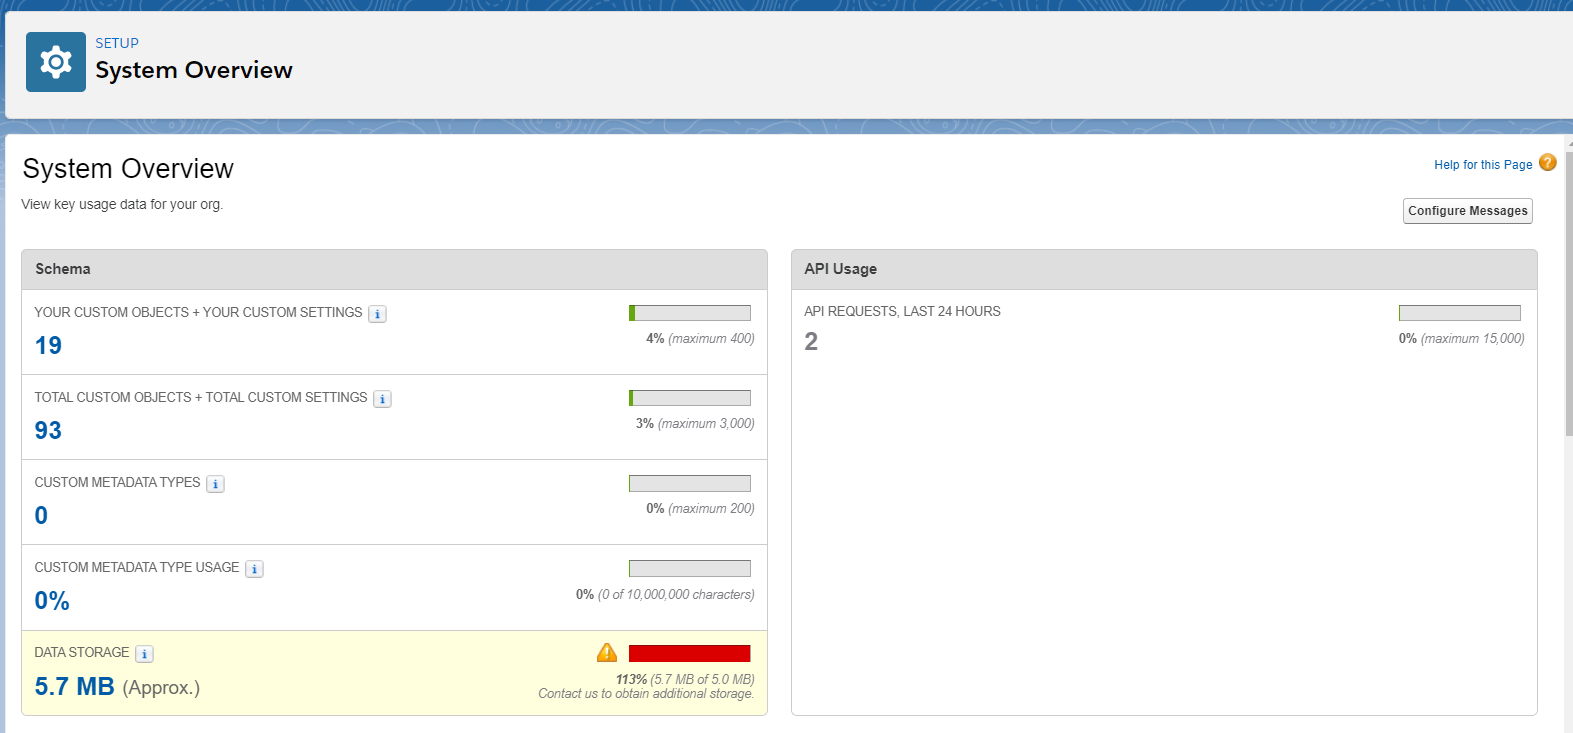
- Pay attention to your storage limits. Your data storage limit in Salesforce has probably been exceeded. You can check your storage limit by clicking Setup → Environments → System Overview. You can increase your data by contacting Salesforce.com or you can delete the data that is not needed. Also pay attention to your storage limits for custom objects, custom metadata types, API usage, business logic data, user interface data, used licenses, and the number of portal roles.
- If you plan to delete any data, I recommend exporting the data by using Data Loader (which I will discuss in another blog post), analyze the data to figure out what is not needed and then use Data Loader to delete the data.
- Empty your recycle bin to free up some space.
-
- To access the Recycle Bin in Lightning Experience, go to the App Launcher under All Items, or add it to the navigation bar.
- To access the Recycle Bin in Classic, it will be available in the left sidebar on the Home page.
- Deleted records remain in the recycle bin for 15 days and can be restored at that time. To permanently remove your deleted items before the 15 day period, administrators and users with the “Modify All Data” permission, can click Empty your Recycle Bin or Empty your organization’s Recycle Bin.